PixLive SDK Programming Guide
Table of Contents
This document presents a step-by-step guide to install the SDK, create an AR Model on PixLive Maker, build a demo application and to run it on a device. It also introduces the common concepts used in PixLive SDK.
Introduction to PixLive SDK concepts
The PixLive SDK is articulated around several components. Those components are represented on figure 1. A typical AR application can work in two different ways (depending on the application goal):
- The AR application ask the Vidinoti AR servers for several AR models. An AR Model includes a target image and some content that is displayed when the target image is recognized. This is call an AR Model throughout the documentation. The AR application is then able to recognize those AR models and to render the augmented reality of those models.
- The AR application embeds the AR models beforehand. The application is then able to recognize only those models and no server interaction is needed.
In the first option, the AR content can change dynamically and the models which have to be recognized can change over time. In the second option, the number of models and the models themselves are bundled with the application. Therefore, the models to be recognized are fixed beforehand and cannot be changed without changing the application.
Figure 1: System architecture
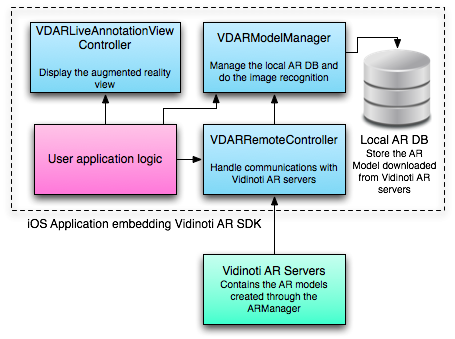
A typical AR application usually use the VDARLiveAnnotationViewController class to display the AR view inside the application. The application configure and use the VDARSDKController to recognize images and to manage the local AR DB (stored on the device itself) which contains the different AR models. At any time, the application is capable of recognizing only the AR Models contained in the local AR DB. The rendering of the augmented reality is done using the PixLiveJS sub system. This system is a scriptable module which is capable of rendering images, videos, sounds, web pages etc.. and to provide interactivity within them. It concretely consists in a JavaScript describing every AR Models. The JavaScript file contains all the annotations (i.e. AR content) which should be display when the model is detected. The interaction can also be programmed with the help of touch events.
An AR Model corresponds to a recognizable object or image. Every AR Model has to be created and entered in the PixLive Maker (available at https://armanager.vidinoti.com ). Each model contains special data used to recognize the object / image represented and the augmented reality content description (see the PixLiveJS documentation for more information).
If the option 1 (described above) is used, the VDARRemoteController class can be used to retrieve AR Models from the PixLive Maker to insert them inside the local AR DB. In the case where the option 2 is used, the local AR DB is read only and is loaded when the application is started. There is no need to do any interaction with Vidinoti AR servers.
Requirements
The PixLive SDK is compatible with the following devices. More recent devices are usually also compatible with the SDK.
- iPhone 4,4S,5,5C,5S,6,6 Plus
- iPod Touch 5th gen.
- iPad 2,3,4
- iPad Air 1,2
- iPad Mini and Mini Retina and second version
Furthermore, the SDK is only compatible with iOS 7.0 and higher.
SDK Licensing
The SDK allows different implementation and use of it, described in the above introduction (named option 1 and 2). In order to work correctly, the SDK needs a special license key (named license key in the API documentation). These information are sent to Vidinoti servers to unlock the use of the SDK. If this verification process fails, the SDK will continue to work during 5 days. After that delay, all SDK API calls will be denied.
In order to authorize the usage of the SDK for a given application, you should use PixLive Maker to enter the application bundle identifier and to retrieve the license key.
SDK Installation
The SDK is provided as a download in the PixLive Maker at http://www.pixlivemaker.com. It is provided as a DMG disk image file. Note that the SDK is only available for Mac OS X Mountain Lion and higher and, at least, requires Xcode 5.
To install the SDK, follow this procedure:
- Download the SDK from PixLive Maker
- Mount the SDK by double clicking on the downloaded file
- Create a directory named
PixLive SDKon your desktop and copy/paste theDemo ProjectandVDARSDK.frameworkfolder of the DMG disk image to thePixLive SDKfolder.
The SDK is now installed in the PixLive SDK folder. When you want to use the SDK in an existing project, a reference to the VDARSDK.framework folder should be given. This folder contains all the SDK binaries and headers required to develop an augmented reality application with Vidinoti technologies.
Demo project presentation and compilation
The following procedure allows you to customize and compile a demo project allowing you to get started with augmented reality and the PixLive Maker. Some key concepts of the demo project are also explained.
The demo project presented here is configured to be synchronized with your account on PixLive Maker. It will synchronize all the AR models you have created.
- Open the
MyARApplicationXcode project located at~/Desktop/PixLive SDK/Demo Project/MyARApplication. - Browse to https://armanager.vidinoti.com, login into your account, click on the PixLive SDK menu item on the left and then on My licenses. You will find there your license key.
Open the
AppDelegate.mfile in the Xcode project and replace theVDAR_SDK_LICENSE_KEYmacro value with your correct license key, whereefwtezerthfghjfgjjghjghwould correspond to your license key, as follow:#define LICENSE_KEY @"efwtezerthfghjfgjjghjgh"- In XCode, change the app bundle ID to something matching your company (e.g. com.mycompanyname.ar)
- In PixLive Maker, go to the My AR Models > My Applications section, on the left menu, and click on the Add a new application button.
- In the form, enter the application bundle ID entered in step 3.
- You can now build the project and install it on your iOS device. Follow the next sections to create an AR Model.
Your app is now ready to be tested. You need now to create some AR Model, which is presented in the next section.
For completeness we explain here the different important pieces of the PixLive SDK API calls.
In the
application:didFinishLaunchingWithOptions:method,the below code will start the whole AR system, load the local AR DB, check for a valid license, and enable AR system. Note that this loading process is done asynchronously and no PixLive SDK API call should be done before the whole system is loaded.if(![VDARSDKController startSDK:modelDir withLicenseKey:LICENSE_KEY]) { NSLog(@"Error while loading the SDK manager. Fatal."); NSAssert(0,@"Error while loading the SDK manager. Fatal."); exit(1); }In order to synchronize the model when the application is launched and resumed from inactive state you have to add the below code (already added in the sample code) to trigger the synchornization. Note that you have to make sure not to trigger to concurrent synchronization. Note that you have to launch the synchronization after the SDK has been loaded. The SDK provided a handy method to do this which is the afterLoadingQueue (NSOperationQueue):
 [[VDARSDKController sharedInstance].afterLoadingQueue addOperationWithBlock:^(void) {
     dispatch_async(dispatch_get_main_queue(), ^(void) {
         [self sync:nil]; //Sync method of the AR sample
     });

 }];
The ARViewController class is actually a sub-class of the VDARLiveAnnotationViewController in charge of rendering the AR view. By doing such a construction and by knowing that VDARLiveAnnotationViewController is conforming to VDARSDKControllerDelegate, this subclass could intercept any event related to model detection.
Warning: When doing such a sub-classing construct, you should not forget to call the super-implementation in all cases. Failing to do so will result in undefined behavior.
AR Model creation
In order to have an AR model displayed in the previously installed demo application, we will create and publish a sample model to use with it.
- To do so, first go to the PixLive Maker webpage at http://armanager.vidinoti.com and log yourself in.
- While you are on the Dashboard page, click on the Create a new AR Model button on the top of the page to start the creation of a new model
- Click on click or drop you image / PDF here button to upload the image the demo application will have to recognize. The image should be be fairly textured and at least of 480x480 pixels large. If the upload fails, it means that your image is not suitable for recognition.
- In the next screen, you are asked to select the region of the image that has to be recognized. If you uploaded an image, the default selection is perfect and you can click continue. If you uploaded a PDF, click on the center of your PDF page.
- Enter a name for your new AR Model and click Send. The description is optional.
- At that 3rd and 4th steps, you are able to set the tags to the AR Model. As the demo app is configured to synchronized any models checked in the My AR Models –> My Applications section of PixLive Maker, you don’t need to enter anything.
- At that stage, the AR Model has been created. In order to have it displayed on the device you have first to create the augmented content or to create a menu of actions the user can do. Creating the augmented content can be done by clicking on the Content Editor button. Note that for creating the Content, a special help page is available within the interface.
- After you have created the content, click on the save button.
- You will be redirected to the AR Model overview page. At that point your AR Model is ready and already published (Observe the greem checkmark on the left of the toolbar).